My name is Paula Saunders, I am based in sunny Tauranga New Zealand & I have been crafting since I can remember. I love to design interactive papercraft projects & projects with a “twist”. I am passionate about helping people enjoy time creating & feeling a sense of achievement. You can see some of my past projects on my facebook design page Paulas Papiere. I look forward to creating with Couture Creations wonderful products
The link to my facebook page is here https://www.facebook.com/paulaspapiere
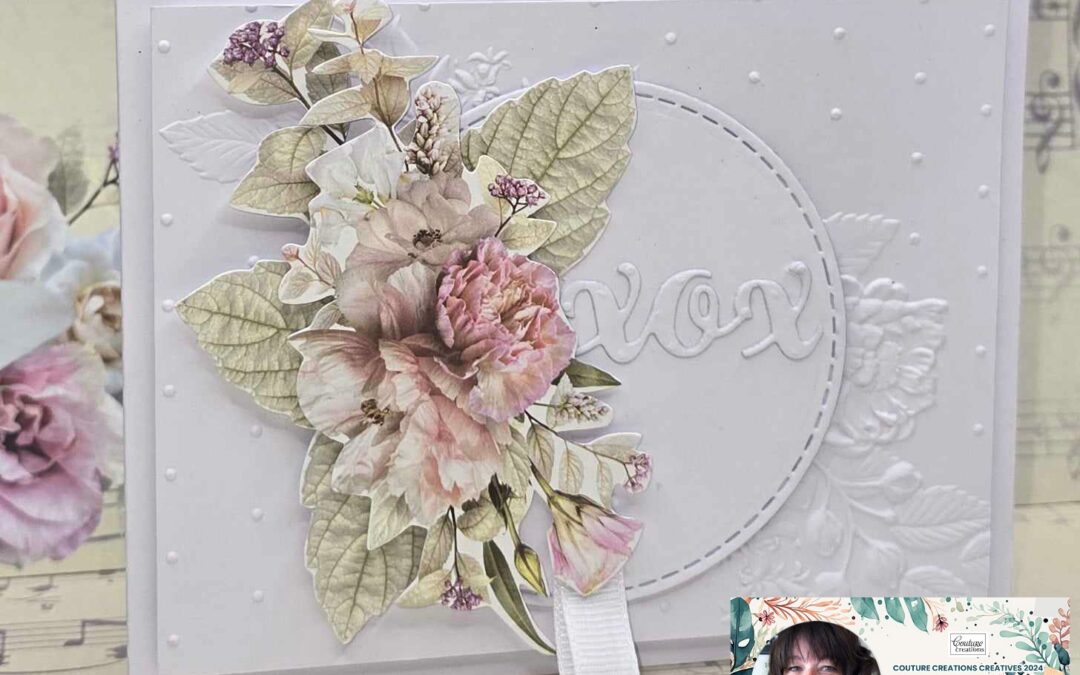
For my first project I have used elements from the Vintage Tea Collection including the 3D embossing folder to create a simple but elegant card with a twist. I hope you give it a go….
INSTRUCTIONS:
- Trim your white 12×12” white cardstock to measure 4 ¼ x 11” & fold in half. This is the card base
- Trim a piece of white cardstock to measure 3 7/8 x 5 1/8”. Use the Vintage Tea embossing folder (CO729005) & Go Cut & Emboss machine (or similar) to emboss this piece of white card.
- Find the center of the top & measure down ¾”, make a pencil mark, poke a hole where the ¾” pencil mark is. Put this piece aside to use later.
- Cut out a 3 ¼” circle & place (DO NOT ADHERE) to the middle of your card front. Turn it over to the back & place a pencil mark through the hole on the embossed piece. Poke a hole where the pencil mark is on the circle piece.
- Place a brad through the hole in the 3 ¼” white circle & through the hole in the embossed piece. Place foam tape around the back of all four sides of the embossed piece & adhere to the front of your card base.
- Fold a small piece of white ribbon in half & adhere to the bottom of the circle.
- Adhere some flowers & leaves from the Ephemera set to the left side of the circle. I have used foam tape to adhere the large flower on the top.
- Cut out the XOXO from the HELLO SENTIMENTS die with white cardstock (I cut off the last O) & adhere to the right of the flowers on the circle.
- Find a small bunch of flowers from the Ephemera Set & adhere under the circle on the embossed image.
- Cut out the green BEST WISHES from the Vintage Tea 12×12” Paper – 08 (CO728991), cut the short ends on a diagonal & adhere over the flowers under the circle. MAKE SURE YOU CAN’T SEE THE FLOWERS OR WORDS UNDER THE CIRCLE WHEN IT IS CLOSED
- Trim a piece of vellum to measure 4 x 10 ½”, fold in half & adhere to the inside of your card. Make sure you place a small strip of double sided tape or glue under the vellum so it is hidden behind the flower. Adhere the flower over the top of the tape under the vellum. Tie a bow with the Bow Maker & glue to the flower. OPTIONAL: Place Winkles Clear Glitter to the flowers for a sparkle
- Use a black pen & draw some lines on the vellum to the left of the flowers


Couture Creations Material List:
- CO728987 12×12 Paper – Vintage Tea Collection – #04
- CO728699 12×12 Cardstock – Smooth White 280gsm
- CO728992 Vintage Tea – Ephemera Set –
- CO729005 Vintage Tea 3D Embossing Folder
- CO728659 XOXO Die – Hello Sentiment
- CO728465 Bow Maker
- CO727863 Parchment Vellum A4 110gsm
- CO729042 Winkles Glitter Marker Crystal Clear
- Other : 3 ¼” Circle Die
Follow me here : https://www.facebook.com/paulaspapiere

FIND OUT MORE ABOUT THIS PROJECT & JOIN US ONLINE
LOOKING FOR A PRODUCT?
Follow this link to find a retailer:
https://couturecreations.com.au/pages/store-locator
HAVE A QUESTION?
Email us here: [email protected]
WANT TO CHECK OUT WHAT'S NEW?
Follow this link to see the newest products coming to a stockist near you...
https://couturecreations.com.au/collections/newest-products
And follow us online to interact with other craft enthusiasts
and be inspired with regular content >>>
YOUTUBE | FACEBOOK | INSTAGRAM