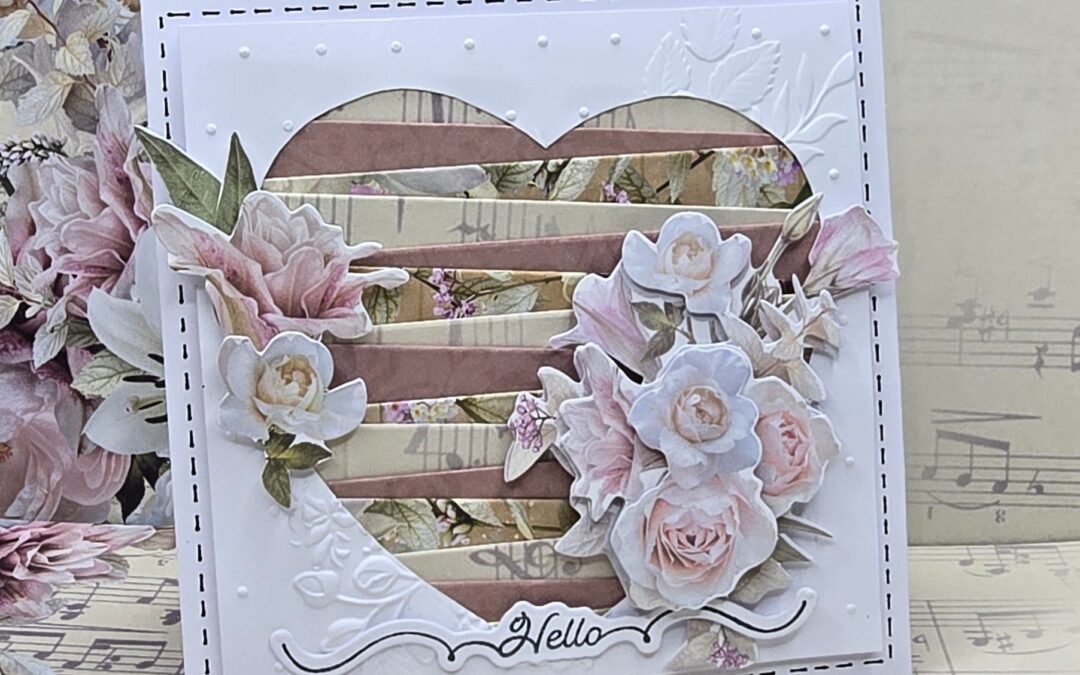
Paula is back with her delightful Heart Framed Iris card created with the Vintage Tea Collection – how pretty is this card – perfect for Mother’s Day on Sunday
A fun card using an Iris Folding technique you can use on so many other designs, & use up all your scrap papers too!
- Trim a piece of white cardstock to measure 5 x 10”, keep the long side at the top of the scoreboard & score at 5”. Fold on the scoreline. This is your card base.
- Trim a piece of white cardstock to measure 4 ½ x 4 ½”, place a heart die (3 ¾”) or template onto this piece of cardstock in the middle, cut it out. Use the Vintage Tea Centred Flowers embossing folder to emboss an image onto this heart aperture
- Trim another piece of white cardstock to measure 5 x 5”. Place pencil marks down the left & right sides at every ½” increments. Draw lines from one side to the other starting from the top right corner to the first pencil mark on the left, then a straight line from the left mark to the right mark, continue until you get to the bottom. This is your Iris Folding Template.
- Trim 5 strips of each pattern paper that measure 1 x 6” (you can use both sides of the paper)
- Use some low tack tape and attach the FRONT of the piece with the heart cut out (so the embossed side is facing down) to the top of the Iris Folding Template
- Fold all the strips in half long ways & start adhering them to the back of the heart (back facing you). Starting at the bottom, line the folded edge of your pattern paper up to the first pencil line, Only glue the strip to the edge of the heart cut out piece. Place a little glue in the middle of the pattern paper to hold it shut
- Then take a different patterned paper strip, fold it in half long ways, place glue along the top of the previous strip & sides of the heart cut out piece then adhere the next strip with the folded edge up against the next pencil line from the bottom. Repeat steps 6 & 7 until you get to the top of your heart
- Take the heart off the Iris Folding Template & turn over to the front to see your pattern
- Adhere the heart to your card base using foam tape
- Use foam tape to adhere the different layers of the Vintage Tea 3D Push Out – Flowers 1 then adhere to the right of the heart
- Adhere a couple of flowers from the Vintage Tea Ephemera Set to the left of the heart using foam tape again.
- Stamp the HELLO image from the Live & Laugh Stamp & Die set then use the die to cut it out. Adhere to the bottom of your card front
- Use a black pen & draw faux stitching on the front of your card up close to the outside of the heart piece
You can visit my creations here: until next time Paula XX
https://www.facebook.com/paulaspapiere


Couture Creations Material List:
- CO728847 Elegance Collection Stamp & Die Live & Laugh
- CO728992 Vintage Tea Collection Ephemera Set
- CO729008 3D Push Out Flowers 1
- CO729005 3D Embossing Folder Centred Flowers
- CO728987 Vintage Tea Collection 12×12” Paper 04
- CO728988 Vintage Tea Collection 12×12” Paper 05

FIND OUT MORE ABOUT THIS PROJECT & JOIN US ONLINE
LOOKING FOR A PRODUCT?
Follow this link to find a retailer:
https://couturecreations.com.au/pages/store-locator
HAVE A QUESTION?
Email us here: [email protected]
WANT TO CHECK OUT WHAT'S NEW?
Follow this link to see the newest products coming to a stockist near you...
https://couturecreations.com.au/collections/newest-products
And follow us online to interact with other craft enthusiasts
and be inspired with regular content >>>
YOUTUBE | FACEBOOK | INSTAGRAM