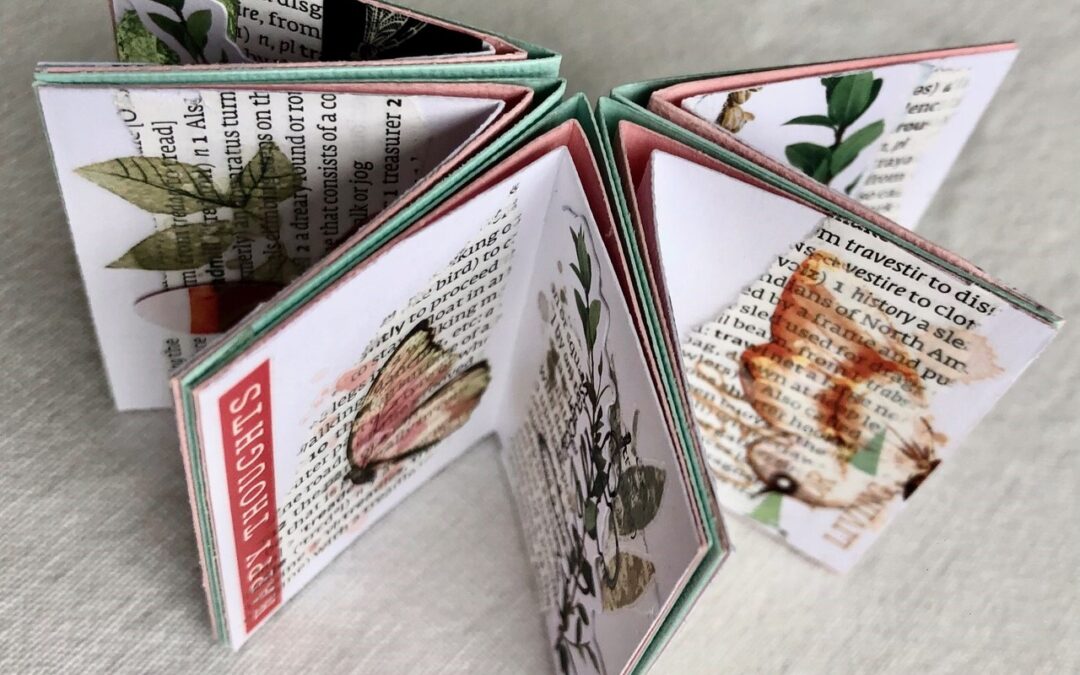
Hi everyone, Michelle here today and It’s a crazy time of the year for most, but I hope that you are all finding a little time to be creative. It has to be good for you. I have been spending a little time in my craft room creating with the gorgeous Elegance collection. Over the years I have come across many star albums – for some reason around Christmas time a few more of them appear – so I thought it was time to play a little – I’ve made a mini star album and I have to say that it came together really quickly and it’s definitely not Christmassy.
Whilst the original idea is not my own, you could make so many of these mini star albums and each and every one of them would be so very unique. I’ve used three different coloured cardstock, Elegance patterned paper from the 6.5” x 6.5″paper pad, ephemera foliage, a touch of foil, some rub ons, some torn pages from an old dictionary, some seam binding, a butterfly die cut and a little washi tape and a whole lot of adhesive. It’s so easy to be creative with this stunning collection.
Cut cardstock as follows :
5 x Charming [2” x 3 ½”]
5 x Fairy Wings [2” x 3 ¼”]
5 x Snow White [2” x 3”]
Score each piece of the cardstock in half. Cut and adhere double sided tape on the back of short ends of all cardstock pieces. Sort in to five groups of the different sizes/colours as though you were making a little book – each section of the star will have a green, a pink and a white page in each section. Adhere the pink cardstock to the green cardstock – you need to take a little time to make sure that each edge is flush with the edge of each layer as you are adhering them to each other. Before you adhere your white page it’s easier to decorate this page first – I’ve added torn pieces of dictionary paper, patterned paper, rub ons [or use your stamps], ephemera pieces, pre-cut die shapes, washi tape and on some of the pages a little green hot foil which I have rubbed on over some double sided adhesive.


When you are making a small mini album like this one – it’s best not to go lumpy and bumpy otherwise you are not going to be able to close your album properly. [That’s part of the reason why I added extra paper layers to give it a little more depth and texture without the bulkiness of lumpy/bumpy].
You will end up decorating five sections before you start to build your mini star album together into one.
Now you need to add adhesive to the back of each of green sections – but only along the outside edge – most important – you do not do this to all of your sections – you will need to keep two pages open for the covers – hope that makes sense.
Cut a strip of seam binding, ribbon, lace, twine [your choice] long enough to go around the centre of your album – before you cut it make sure you have sufficient to tie shut – you need to add double sided tape and adhere – keep your adhesive away from the spine though, otherwise your mini book will not open and close.
Make your covers [using two pieces of cardstock] cover with your patterned paper – cut away on the angle at each of the corners – see photo – add adhesive and score edges to keep them sharp when you fold them over.
Covers – front and back
2 x Charming [2” x 2”]
2 x patterned paper [2 ¾” x 2 ¾”]
Refer to photo for covers :


Adhere your covers to the front and back of your mini star album – tie closed.
You could gift this wee mini star album closed like a little book and leave a note to say that it can stay closed or it can remain open, displayed in the shape of a star and tied closed while it remains open. Have fun.
Couture Creations Materials List :
- CO728822 – Elegance collection 6.5” x 6.5” paper pad
- CO728831 – Elegance ephemera set
- ULT200001 – Snow White cardstock
- ULT200020 – Charming cardstock
- ULT200079 – Fairy Wings cardstock
- CO721983 – double sided tape
- CO725038 – scissors
- CO726325 – Adhesive – quick dry
- CO728511 – All purpose – art glue
- CO726045 – Heat Activated mint green foil
Happy crafting everyone. Until next time. Michelle [aka Mrs Frizz]
Happy crafting everyone! Until next time ~
Michelle [aka Mrs Frizz)
You can follow me online for more of my work now on:
Instagram @mrsfrizz
My Blog @frisbys.blogspot
FIND OUT MORE ABOUT THIS PROJECT & JOIN US ONLINE
LOOKING FOR A PRODUCT?
Follow this link to find a retailer:
https://couturecreations.com.au/pages/store-locator
HAVE A QUESTION?
Email us here: [email protected]
WANT TO CHECK OUT WHAT'S NEW?
Follow this link to see the newest products coming to a stockist near you...
https://couturecreations.com.au/collections/newest-products
And follow us online to interact with other craft enthusiasts
and be inspired with regular content >>>
YOUTUBE | FACEBOOK | INSTAGRAM