")
")
")
")
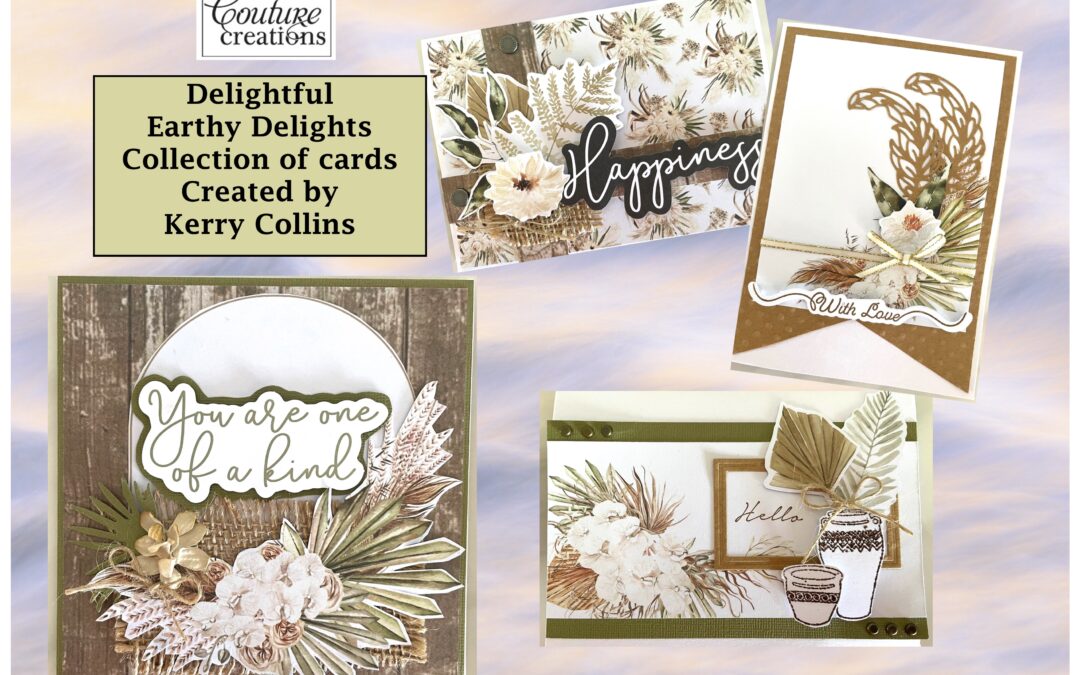
HI everyone, Kerry here with my project for Couture Creations – my set of 4 cards created with the Couture Creations Earthy Delights collection. I have instructions for cutting all the pieces to created these cards and then you go to the assembly part of instructions to put your cards together. I hope you have a delightful time creating these cards.. Until next time ..Kerry XX
Cutting Instructions – from the 6.5 x 6.5 Paper pad
- 05 – Timber – cut one 13xm x 13xm (Card 1)
- 05 – Timber – cut one 2cm x 10.5cm (Card 3)
- 05 – Timber– cut one 2cm x 14.8cm (Card 3)
- 07 – Flower/Oval Frame – cut out flower, cut out frame (Card 1)
- 03 – Flowers – cut one 14.3cm x10cm (Card 3)
- 08 – cut one 9cm x 11.5cm from the left side (Card 2)
- 08 – cut one 7cm x 14.8cm from the right side (Card 4)
Stamping & Heat Embossing
- Using Coffee ink, stamp the saying ‘With Love’ on the White card (Card 2)
- Using Coffee ink, stamp the saying ‘Hello’ onto the front of the 14.8cm x 7cm paper pad piece. Have the piece in the landscape position and stamp slightly right of centre. (Card 4)
- Using Embossing ink, stamp the two Decorative Pots onto White card, add Embossing power and heat set using the heat tool. Fussy cut the stamped images.
Die Cutting
- Battle Fatigue card stock – die cut one Palm Leaf
- Kraft card stock – die cut the smallest frame from the Frame set
- Kraft card stock – die cut two Floating Feathers
- Using the matching dies, cut out the two stamped (and embossed) Decorative Pots
Assembly Instructions
Card 1 – You are one of a Kind (Square)
- Attach the 13cm x 13cm Battle Fatigue piece to the White card front.
- Attach the 13cm x 13cm timber piece to the centre, leaving even borders.
- Attach the cut oval piece to the card front, close to the top and centred side to side.
- Attach the ephemera saying to some remaining Battle Fatigue cardstock. Fussy cut around the saying leaving a small border and mount to the centre of the card.
- Glue the 10cm x 6cm piece of hessian to the card front, under the saying.
- Attach the ephemera flower piece across the bottom and up to the right-hand side of the card, overlapping the hessian.
- Attach a die cut palm leaf and a flower to the right of the hessian and above the ephemera piece.
- Tie a bow in the piece of twine and attach, using a glue spot, to the ephemera cluster.
Card 2 – With Love (Portrait)
- Cut a ‘V’ in the end of the Kraft piece and attach the card front.
- Attach a piece of ribbon around the 9cm x 11.5cm 08 Paper Pad piece.
- Attach this piece to the cut front, leaving even borders at the top and sides.
- Attach the two die cut feathers to the right-hand side of the card.
- Attach a flower and two leaves form the ephemera pack to the card as shown.
- Tie a bow in the remaining ribbon and attach with a glue dot to the ribbon that is wrapped around the card.
- Mount the ‘With Love’ saying towards the bottom of the card as shown.
Card 3 – Happiness (Landscape)
- Attach the 14.3cm x 10cm 03 Flower piece to the card front.
- Attach a brad through one end of each 2cm Timber strip.
- Attach the timber pieces to the card front, the shorter strip in the vertical position and the longer strip in the horizontal position, overlapping towards the bottom right corner of the card.
- Attach the 5cm x 5cm piece of hessian to the overlapping timber pieces.
- Arrange and attach ephemera pieces to the card front as shown.
- Tie a bow in some twine and attach under the ephemera flower.
- Mount the word Happiness across the horizontal timber strip.
Card 4 – Hello (Landscape)
- Attach the 7cm x 14.8cm paper pad piece across the centre of the card front with the printed image in the left corner.
- Attach three brads in one end of each 14.8cm x 1cm Battle Fatigue strip.
- Attach the strips across the card front, one to the top and one across the bottom of the 7cm x 14.8cm paper pad piece.
- Attach the die cut frame to the card front framing the ‘Hello’ stamped word.
- Mount the two die cut decorative pots to the bottom right of the card front and attach two ephemera leaves to the card front, coming out of the pots.
- Tie a bow in some twine and attach to the top of the large pot.
Couture Creations Material List
- CO728878 Earthy Delights 6.5 x 6.5 paper pad
- CO728887 Earthy Delights ephemera pack
- CO728893 Earthy Delights Palm Leaf stamp & die set
- CO728896 Earthy Delights Decorative Pots stamp & die set
- CO728848 Elegance With Love Mini sentiment and die set
- CO728376 Floating feather stamp and die set
- CO723893 A6 card and Envelopes set white (3)
- CO724845 square card and envelopes set white (1)
- ULT200039 Battle Fatigue card stock (cut 1 of 13.5cm x 13.5 cm / cut 2 of 14.8cm x 1 cm ) ( extra for die cuting)
- CO727180 A4 card stock white ( stamping and die cutting)
- CO728950 Kraft card stock (cut 2 of 10cm 14.3cm + extra for die cutting)
- CO728468 Guillotine trimmer
- CO726327 Tacky glue
- CO728287 Adhesive Foam
- CO723978 Multi Purpose Heat Tool
- CO724972 Copper Embossing powder
Other items
Ribbon , cream / gold edge / hessian / paper flowers / brads

FIND OUT MORE ABOUT THIS PROJECT & JOIN US ONLINE
LOOKING FOR A PRODUCT?
Follow this link to find a retailer:
https://couturecreations.com.au/pages/store-locator
HAVE A QUESTION?
Email us here: [email protected]
WANT TO CHECK OUT WHAT'S NEW?
Follow this link to see the newest products coming to a stockist near you...
https://couturecreations.com.au/collections/newest-products
And follow us online to interact with other craft enthusiasts
and be inspired with regular content >>>
YOUTUBE | FACEBOOK | INSTAGRAM