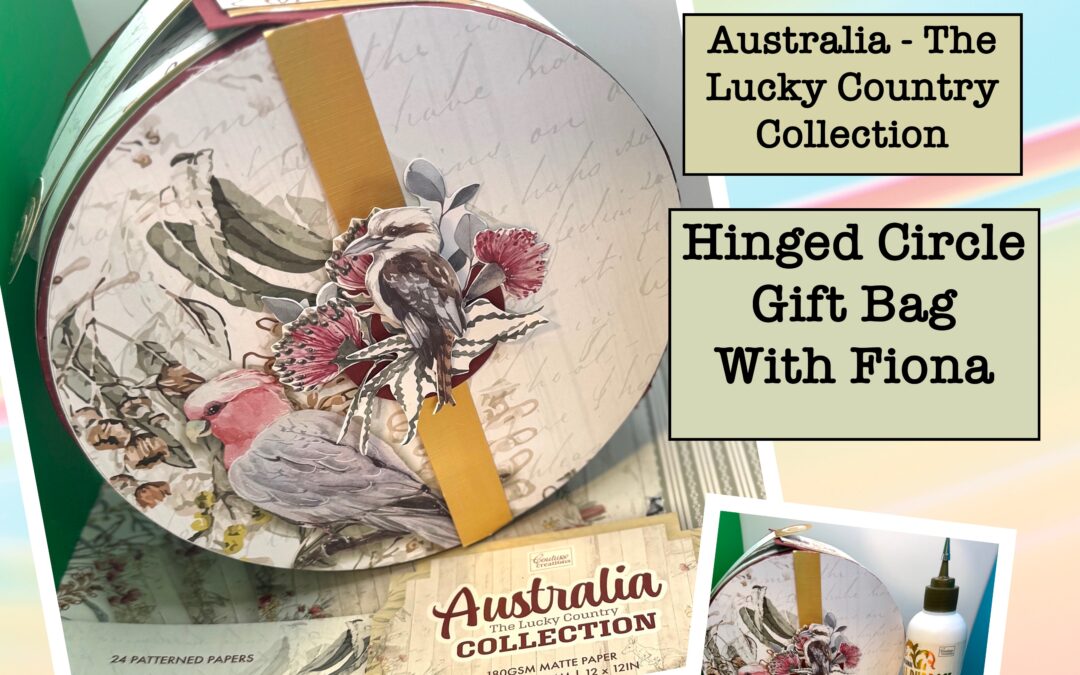
Hello, welcome back ! Fiona here today and we are making this beautiful hinged circle gift box today with the New release – Australia – The Lucky Country paper collection. There is a cutting list at the bottom of this post but I would highly recommend you watch the video first then put this one together, while it’s not a hard process there are a few steps to it.
PLEASE BE ADVISED THAT IN THE VIDEO I SAID WE WILL SCORE AT ½’ AND 3’1/2 INCHES THIS IS INCORRECT YOU WILL SCORE AT ½’ AND 3’3/4 INCHES THANK YOU SO MUCH .
Because we are using patterned papers when you cut your circles you will want to keep your patterned pieces together so that you know which is which i used some clips to do this. I also recommend that you cut an extra circle and adhere it to your papered pieces just to make it a little sturdier but by no means is it essential,
- Cut the extra circle attach it to your 2 outer circles then with a guillotine trimmer, to cut the circle in half by lining up the side of our circle at the 3’1/2-inch mark, making sure your circle is sitting right at the top see video. Put theses aside for now.
- With the 2 pieces of 4”x 11”3/4 inch and score them ½” and 3”1/2 inches with the 4” side at the top. Fold on score line with bone folder and mark off approximately 21/2” on one end of each of them. Then curl the paper with your bone folder, see video more details.
- Using scissors – cut small triangles out of each side up to the 2 1/2” line we marked earlier (see video for the first cut)
- Using the patterned circle that is already cut half , attach it to the 4’ x 11 3/4” piece we just cut triangles out. I added glue to curved edge of my half circle and adjusted the triangles around the edge of the circle, making sure it lined up then we will get on of our back pieces and attach it on the opposite side you should now have a half circle piece that is a bit longer on one end ( you may need to cut a few more triangles out so that it meets at the edge of your half circle. Put that piece aside and we are going on workthe other half doing to same process , just check to make sure you’re putting the right patterned pieces together with their correct bottom piece the 2 1/2″ piece should be on the opposite end of the project, so you will have a piece hanging over on each end when they match up. Please see video.
- On the bottom piece, that we created first, grab a ruler and a stylus and score a line across the overhanging flap this will become our hinge for the box.
- At this stage we use our 2 7” x 11/4” pieces and glue them to the inside top edge of our box, this will help our box to close securely. You may need to trim a small amount off for it to fit nicely see video, adhere glue on half of this piece and glue it to the inside edge the the other half above the box. Once you have done that on both sides of the bottom half of the box you can add a contrasting or patterned Half circle paper to the inside. This has two purposes one to make it look clean and tidy and the other to strengthen the box. We will also add the contrasting or coloured half circle papers to the inside of the top half of the box now as well. You should now have 2 halves of our box the tab that we scored earlier. Trim off the scored bits on each side and add glue to the flat piece and join the box halves together the tab goes on the inside of the lid. Let that set for a moment.
- Using a strip of gold foil cardstock and the patterned papers, glue them one on top of the other to create the decorative element that goes around the box, 2 x 2 1/2 “x11”3/4 and 2x 2”x 11” 3/4. Once, all dry enough, add them to the contrasting curve of our box, see video if you are not sure.
- With the 2 x 7”1/2 x ½” , add it to the front and back of one edge of the closed box, (see video if you are not sure) Once that is attached on the top part of the box, created a cluster out of the Ephemera pack to add to the front of the box.
- Put together a closure 3”3/4 x 1” 2”3/4 x1/2” glue one on top of the other.
- You should now have only the circle pieces left to glue the smaller one on top of the bigger one, Once dry, add our hook and loop (Velcro dot) and attach it to the box so that it stays closed.
I loved creating this box I hope you will enjoy it too. So many things you could store in it or gift in it you could also add some ribbon to this to make it look like a handbag.
Here is the link for the YouTube video: https://www.youtube.com/watch?v=nBXwvKpEggo
Hinged circle gift box cutting guide.
Cut x 2 – 7″ circles in the pattern card of your choice.
Cut and extra 2 x circle to attach to our patterned paper this is to make it sturdier i used just some white cardstock.
Cut 2 x 7″ circles in a plain matching colour to cover the inside of the bag.
2 pieces of 4″ x 11.3/4″ A4 length cardstock for the sides. Score along the 4″ side at 1/2″ & 3.1/2.
2 pieces of 2.1/2″ x 11.3/4″ A4 length mirrored cardstock to cover the sides.
2 pieces of 2″ x 11.3/4″ A4 length pattern paper to decorate the sides.
2 pieces of 7″ x 1.1/4″ white card for the inside side tabs
2 pieces of 1/2″ x 7.1/2″ cardstock for the outside.
2 circles approximately 1.1/8″ in diameter for the closure.
2 circles approximately 3/4″ in diameter to layer over the closure.
1 piece of 3 3/4″ x 1″ for the closure
1 piece of 2 3/4″ x 1/2″ for the closure 2 3/4″ x 1/2″


Couture Creations Material List
- CO729070 Australia The Lucky Country paper pad 12 x 12
- CO729080 Australia The Lucky Country ephemera set
- CO726343 Mini guillotine
- Co723973 Paper Timmer
- CO726342 Scoreboard
- ULT 200104 Rose cardstock
- CO728522 Detail scissors
- CO728513 All purpose art glue
- CO728286 Hook and loop spots 10mm
- C)725407 Mirror foiled Gold cardstock
Thanks for today and I hope you enjoyed my project , Fiona XX

FIND OUT MORE ABOUT THIS PROJECT & JOIN US ONLINE
LOOKING FOR A PRODUCT?
Follow this link to find a retailer:
https://couturecreations.com.au/pages/store-locator
HAVE A QUESTION?
Email us here: [email protected]
WANT TO CHECK OUT WHAT'S NEW?
Follow this link to see the newest products coming to a stockist near you...
https://couturecreations.com.au/collections/newest-products
And follow us online to interact with other craft enthusiasts
and be inspired with regular content >>>
YOUTUBE | FACEBOOK | INSTAGRAM