Hi everyone, it’s Cheryl here.
My post today is a little different. Today I’m showing you a technique that’s been around for decades, but used in another capacity. For this card, I’ve applied it to 3D embossing folders. For both cards, I have created the main focal point using the gorgeous Vintage Tea Centred Flowers 3D Embossing Folder.
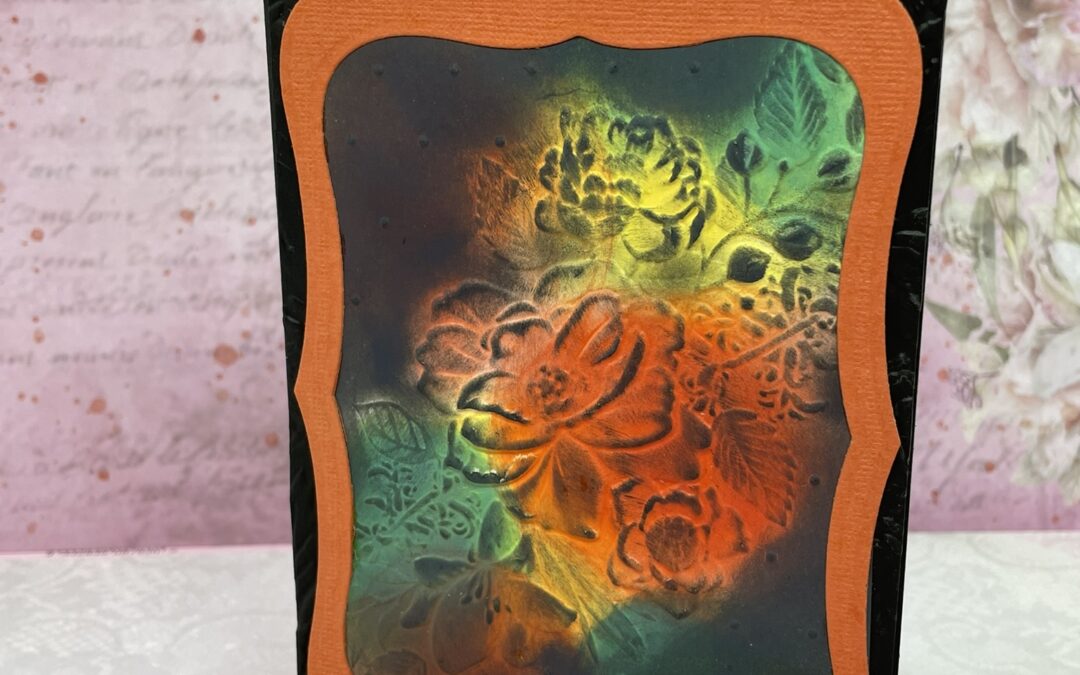
Start off with regular cardstock and using blending brushes apply patches of colour over the cardstock. (See example in image.) Next spray the back of that cardstock with water. Give it a good spray, but not enough that the cardstock will fall apart. *The first card I made didn’t have enough water, and you can see the resulting cracks in the image. (It is the card without the Persimmon frame.)
Lay the damp piece of the card on the opened 3D embossing folder, then close it. I have a Go Power and Emboss machine, and found I could use almost the identical layering to a normal embossing folder, except I needed to use a C Plate instead of a B Plate at the top. Experiment with your machine for the correct layering. ***Don’t force your layers through as it may damage your machine and/or embossing folder. If it won’t go through, the layers are too thick and you’ll need to remove some.
After running the emobssing folder through my Go Power and Emboss machine, I used my heat tool to dry the card quickly. Alternatively, you can put it aside to dry. You can already see in the image how pretty this looks, although it does appear a little untidy at this point.
Next, using black or another dark colour ink, and your blending brushes, cover all around the outside of the embossed area and cover the excess colour that is outside the embossed image. This will cover up the unwanted colour. You can use a tiny brush for the smaller areas. If you also want the dark outline on the image as I’ve done, lightly brush over the image. Don’t press on it, or it will darken the coloured areas.
For the card with the decorative frame, I also embossed the topper using the Assorted Flowers 3D Embossing Folder. This gave the card some added interest. Then I layered the embossed piece and the frame.


Couture Creations Material List
- CO729005 – Vintage Tea Centred Flowers 3D Embossing Folder
- CO729006 – Vintage Tea Assorted Flowers 3D Embossing Folder
- CO727180 – Cardstock – 12 x 12in smooth – White – 280gsm – 100 pack
- CO728954 – Cardstock – 12 x 12in smooth – Black – 280gsm – 10 sheets
- ULT200062 – 12x12inch Cardstock – Persimmon
- ULT200020 – 12x12inch Cardstock – Charming
- CO727948 – Blending Brush, medium
- CO728512 – All Purpose Art Glue – 120ml
- CO726327 – Couture Creations Tacky Glue 118ml
- CO728463 – Couture Creations Glue & Residue Eraser
- CO728468 – Trimmer – Guillotine 12inch/30cm
Thanks so much for stopping by. I hope you enjoyed my creations today. Happy Crafting Cheryl XX

FIND OUT MORE ABOUT THIS PROJECT & JOIN US ONLINE
LOOKING FOR A PRODUCT?
Follow this link to find a retailer:
https://couturecreations.com.au/pages/store-locator
HAVE A QUESTION?
Email us here: [email protected]
WANT TO CHECK OUT WHAT'S NEW?
Follow this link to see the newest products coming to a stockist near you...
https://couturecreations.com.au/collections/newest-products
And follow us online to interact with other craft enthusiasts
and be inspired with regular content >>>
YOUTUBE | FACEBOOK | INSTAGRAM