Hi Everyone, Anet here today and welcome to my inspiration post. Today, I made a Card and Gift Box with the Elegance Collection from Couture Creations. I used the foil, die-cut and heat emboss techniques to create my card. I found the inspiration from Julie’s Blog. I did not follow all her steps, instead I made some changes and put my spin on it.
Step by Step Instructions:
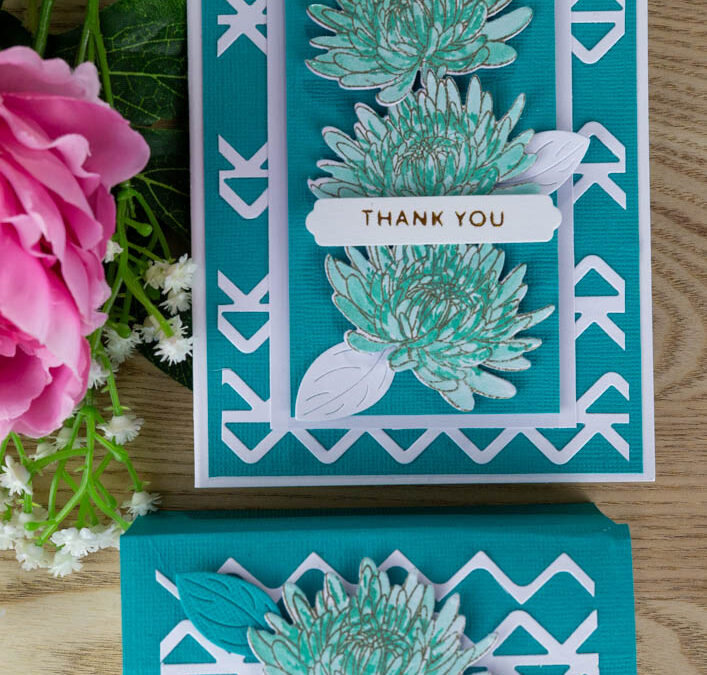
Card
Trim Caruso Cardstock to 3 7/8″ x 5 5/8″ and layered it onto the card front. To create a background, die-cut white cardstock with the Elegance Beautiful DL Border Die and layered it onto the card front. I think this is just a great idea to use the border die in another way. Following on from this, cut Smooth White Cardstock to 2 5/8″ x 4 3/4″ and adhered it onto the card front. Cut Caruso Cardstock to 2 3/8″ x 4 1/2″ and adhered it onto the white cardstock using 3D foam Dots. Stamp the Elegance Aster Stamp onto Smooth White Cardstock using the Embossing Ink Pad and Metallics Embossing Powder and heat emboss it. Stamp the Elegance Aster Stamp onto the embossed Aster using Card Deco Essentials Turquoise Pigment Ink. Colour the aster flowers using the Turquoise Pigment Ink with a Water Brush, die-cut it with the Elegance Aster Die and adhered it onto the card front using 3D foam dots. Foil with the Elegance Sending Love Hotfoil Stamp using Smooth White Cardstock, Gold Matt Finish Heat Activated Foil and the GoPress and Foil Machine. Following on from this I die-cut the foiled sentiment with the Elegance Sending Love Hotfoil Die and adhered it onto the card front using 3D Foam Dots.
Follow my video tutorial below to learn how to foil with the Elegance Sending Love Hotfoil Stamp.
Video Link: https://www.youtube.com/watch?v=6PMP4Uzp98E
Die-cut white cardstock with the You Are Adorable Leaf Die and adhered it onto the card front.


Gift Box
Trim Smooth White Cardstock to 8 1/2″ x 10″ and score it at 1 1/2″ and 3″ on all sides using the Scoring Board. Fold the scored lines and cut the cardstock. The photo down below shows you how to cut the cardstock.


Following on from this I first glued the small tabs onto the cardstock using Turbo Tacky Glue. Trim the other two flaps using the Tabletop General Scissor and glued the top tabs to the inside of the box to reinforce it. Cut Caruso Cardstock to 4 1/4″ x 9 3/4″ and scored it at 1 1/2″, 3″, 5 5/8″ and 7 1/8″. Fold the score lines and die-cut the 7 1/8″ side with the Elegance Beautiful DL Border Die. Glue the white box onto the cardstock and also the sides of the box. I added a Hook and Loop Spot to close the two flaps of the gift box. Add the white cardstock border die-cuts onto the front of the lid using All Purpose Art Glue. Refer to my card instructions above on how to die-cut the Elegance Beautiful DL Border Die. Stamp and heat embossed aster flower, die-cut Caruso Cardstock with the You Are Adorable Leaf Die and adhered it onto the flap using 3D foam dots to finish.


Couture Creations Material List:
- C0728836 Elegance Beautiful DL Border Cutting Die Set
- C0728845 Elegance Aster Mini Layering Stamp and Die Set
- C0728838 Elegance You Are Adorable Layered Sentiment Cutting Die Set
- C0728852 Elegance Sending Love Hotfoil Stamp and Die Set
- ULT200030 Ultimate Crafts 12 x 12 Caruso Cardstock
- C0728699 Smooth White Cardstock 280gsm
- C0726520 GoPower & Emboss Machine
- C0727163 GoPower & Emboss Magnetic Platform
- C0725032 GoPress and Foil Machine
- C0725355 Gold Vintage Matte Finish Heat Activated Foil
- C0726342 Scoring Board 12 x 12
- C0727860 Glass Mat
- C0728524 Tabletop General Scissor
- C0727381 Precision Stamp Press
- C0728299 Stamp Scrubber
- C0728094 Stamp Cleaner
- C0728278 Embossing Ink Pad
- C0724973 Mirror Platinum Classic Metallics Embossing Powder
- CDEIPL005 Turquoise Card Deco Essentials Pigment Ink
- C0728387 Water Brush Pack
- C0728286 Hook and Loop Spots
- C0728511 All Purpose Art Glue
- C0728515 Turbo Tacky Glue
Follow me on my personal blog here:
https://anetscrafting.blogspot.com
Follow me on my YouTube here:
https://www.youtube.com/@anetscrafting
Thank you for visiting today and I hope you enjoyed how I created my Card and Gift Box. Happy Crafting! Anet

FIND OUT MORE ABOUT THIS PROJECT & JOIN US ONLINE
LOOKING FOR A PRODUCT?
Follow this link to find a retailer:
https://couturecreations.com.au/pages/store-locator
HAVE A QUESTION?
Email us here: [email protected]
WANT TO CHECK OUT WHAT'S NEW?
Follow this link to see the newest products coming to a stockist near you...
https://couturecreations.com.au/collections/newest-products
And follow us online to interact with other craft enthusiasts
and be inspired with regular content >>>
YOUTUBE | FACEBOOK | INSTAGRAM