
Hi Everyone, Anet here today and welcome to my inspiration post. I made two cards and a video showing you how to add texture to stencilled flowers. I used the Flourish & Thrive Christmas Bells Stencil, Stamp & DieCut Collection from Couture Creations.
Step by Step Instructions:
My video tutorial below will show you how to add texture to stencilled flowers.
Are you ready to learn how to add Texture to Stencilled Flowers? Grab a cuppa and just click the video link.
Video Link: https://youtu.be/SBOooxn2-GU
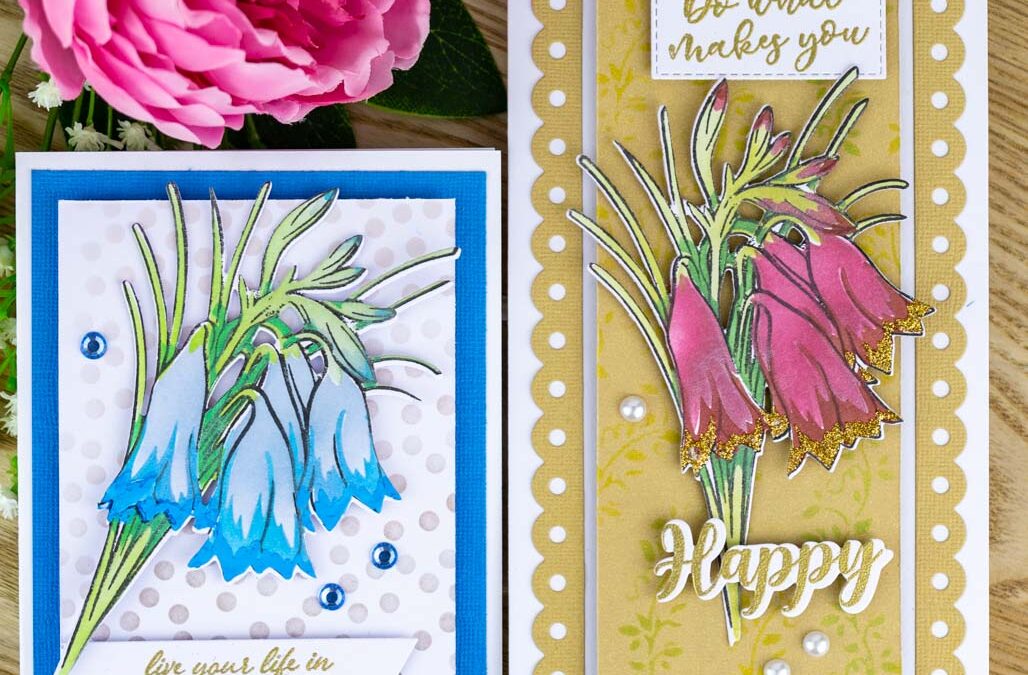
Card 1 – Glitter Texture
Die-cut the Paper Bag Cardstock with the Deck The Halls Happy Holidays Tall Die Set and adhere it onto a White Tall Card. To create a background ,ink the Paper Bag Cardstock with the Christmas Bells Stencil and Gold Pigment Ink. Stamp the Christmas Bells Sentiments onto Smooth White Cardstock and heat emboss it. Then die-cut the Christmas Bells Happy Sentiment and adhered the sentiments onto the card front using 3D foam dots.
Follow my video above where I show you how to colour the leaves and flowers of the Christmas Bells Stamp. I used Smooth White Cardstock and the Stamp and Colour Outline Ink Pad Black to stamp the image. To colour the leaves and flowers I used the Blending Brushes with Olive Green, Christmas Green, Burgundy and Eggplant Pigment Ink.
Adding texture with a pallet knife and adding Glitzin Glamour Aztec Gold onto the Christmas Bells Stencil. To finish I die-cut the Christmas Bells Image using the Christmas Bells Die and added it to the card front using 3D foam dots.


Card 2 – Embossing Texture
I first trimmed Blue Moon Cardstock to 3 7/8″ x 5″ and layered onto the card front. I then trimmed Smooth White Cardstock to 3 3/8″ x 5 1/8″. To create a background I inked the Smooth White Cardstock with the Christmas Bells Dotted Stencil and Pale Brown Dye Ink. Follow my video above where I show you how to colour the leaves and flowers of the Christmas Bells Stamp. I used Smooth White Cardstock and the Stamp and Colour Outline Ink Pad Black to stamp the image. To colour the leaves and flowers I used the Blending Brushes with Leave Green, Apple Green and Mid Blue Pigment Ink as well as Light Blue Dye Ink. To add texture I used a pallet knife and added Gesso mixed with Ink onto the Christmas Bells Stencil. Follow my video tutorial above where I show you how to add texture to stencilled flowers. I stamped the Christmas Bells Sentiment onto Smooth White Cardstock, heat emboss it and adhered it onto the card front using 3D foam dots.To finish I die-cut the Christmas Bells Image using the Christmas Bells Die and added it to the card front using 3D foam dots.


Couture Creations Material List:
- C0726520 GoPower & Emboss Machine
- C0727163 GoPower & Emboss Magnetic Platform
- C0728701 All-In-One Magnetic Art Work Station
- C0727860 Glass Mat
- C0727381 Precision Stamp Press
- C0728299 Stamp Scrubber
- C0728094 Stamp Cleaner
- C0728475 Stamp and Colour Outline Ink Pad Soft Black
- C0727947 Large Blending Brush
- C0727948 Medium Blending Brush
- C0728722 Flourish & Thrive Christmas Bells Stencil, Stamp & DieCut Set
- C0728532 Deck The Halls Happy Holidays Tall Card Nesting Die Set
- C0728699 Smooth White Cardstock 280gsm
- ULT200014 Ultimate Crafts 12 x 12 Blue Moon Cardstock 250gsm
- ULT200045 Ultimate Crafts 12 x 12 Paper Bag Cardstock 250gsm
- C0724847 White Tall Card & Envelope Set
- CDEIPL007 Leave Green Card Deco Essentials Pigment Ink
- CDEIPL015 Mid Blue Card Deco Essentials Pigment Ink
- CDEIPL017 Apple Green Card Deco Essentials Pigment Ink
- DEIPL018 Olive Green Card Deco Essentials Pigment Ink
- DEIPL021 Burgundy Card Deco Essentials Pigment Ink
- DEIPL023 Christmas Green Card Deco Essentials Pigment Ink
- DEIPL026 Gold Card Deco Essentials Pigment Ink
- DEIPL032 Eggplant Card Deco Essentials Pigment Ink
- CDEIPU018 Light Blue Card Deco Essentials Dye Ink
- CDEIPU033 Pale Brown Card Deco Essentials Dye Ink
- C0721981 Glitzin Glamour Aztec Gold
Follow me on my personal blog here:
http://www.anetscrafting.blogspot.com.au/
Follow me on my YouTube here:
https://www.youtube.com/channel/UCMNDjLhp-1n6YGsynAdAPjg
Thank you for visiting today and I hope you enjoyed my Textured Stencilled Flower Cards. Happy Crafting! Anet

FIND OUT MORE ABOUT THIS PROJECT & JOIN US ONLINE
LOOKING FOR A PRODUCT?
Follow this link to find a retailer:
https://couturecreations.com.au/pages/store-locator
HAVE A QUESTION?
Email us here: [email protected]
WANT TO CHECK OUT WHAT'S NEW?
Follow this link to see the newest products coming to a stockist near you...
https://couturecreations.com.au/collections/newest-products
And follow us online to interact with other craft enthusiasts
and be inspired with regular content >>>
YOUTUBE | FACEBOOK | INSTAGRAM